

Since writing my rant concerning the schema conspiracy of internet analytics platforms, I’ve been giving the entire thought of hit-level knowledge assortment a whole lot of thought. Sessionization could be very closely carried out in Google Analytics, which is comprehensible, however the common Google Analytics API simply doesn’t provide the sort of data you’d want, should you wished to sew hits collectively in a different way in your individual backend. In reality, there are 4 distinct ranges of aggregation that aren’t uncovered through the API, regardless that I believe they need to:
-
Hit timestamp – You’ll be able to’t question for the precise timestamp of a Google Analytics hit through the API. You’ll be able to’t get it in your customized stories, both. Nonetheless, this may be very significant data, particularly if you wish to confirm knowledge integrity throughout techniques.
-
Session ID – Hits are grouped collectively into periods. Nonetheless, utilizing the API alone, you will be unable to simply establish if two distinct hits belong to the identical session.
-
Consumer ID – Periods are bunched below a Consumer ID. Each occasion of the
_gacookie will get a novel Consumer ID, which is how the Google Analytics backend is aware of that the identical “Person” has visited the location a number of occasions. This Consumer ID shouldn’t be uncovered in any dimension you may question through the API. -
Person ID – The Person ID function in Common Analytics teams collectively hits, periods, and Consumer IDs. It’s the highest potential stage of abstraction and aggregation accessible in Google Analytics. Nonetheless, the info rows don’t expose if a success/session belongs to a particular Person ID.
So, the aim of this publish is to provide the instruments to annotate your incoming hit-stream knowledge with all the knowledge listed above. For knowledge integration, that is virtually a necessity, particularly in case you have a fancy mesh of techniques throughout which you wish to be part of arbitrary knowledge.
Within the following chapters, we’ll construct 4 Customized Dimensions and 4 knowledge assortment strategies that may allow you to embrace this data in your knowledge set. We’ll, after all, be utilizing Google Tag Supervisor to make issues extra manageable.
X
The Simmer Publication
Subscribe to the Simmer publication to get the newest information and content material from Simo Ahava into your e mail inbox!
1. The Technique
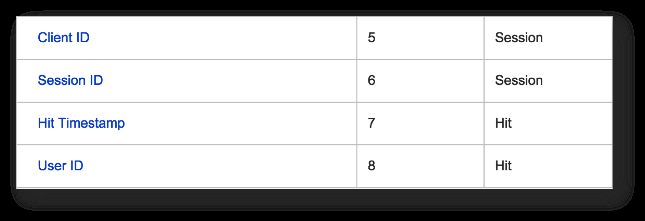
I’ve created a Customized Dimension for every of the 4 use circumstances. Two of the scale are session-scoped, and two are hit-scoped. The scale are:
-
Consumer ID – session-scoped Customized Dimension that collects the Consumer ID set by Google Analytics
-
Session ID – session-scoped Customized Dimension that collects a randomized Session ID
-
Hit Timestamp – hit-scoped Customized Dimension that collects the precise timestamp of every hit in native time, with the timezone offset included
-
Person ID – hit-scoped Customized Dimension that collects the Person ID that will get set when somebody logs into your web site
Why a hit-scoped Customized Dimension for Person ID, you ask? Nicely, the entire privateness dialogue round consumer monitoring is sophisticated, and I might quite be poked repeatedly within the eye with a useless ferret than be drawn into it. By monitoring Person ID with a hit-scoped Customized Dimension, you’ll solely gather the info from logged-in customers. As quickly as they sign off, or in the event that they re-enter the web site having logged out, Person ID is not going to be despatched with the hits. If the Customized Dimension had been session-scoped, and even user-scoped, you’ll be amassing Person ID for doubtlessly logged-out guests as properly, and that may be within the gray space privacy-wise.
The top results of combining all this data shall be one thing like this:
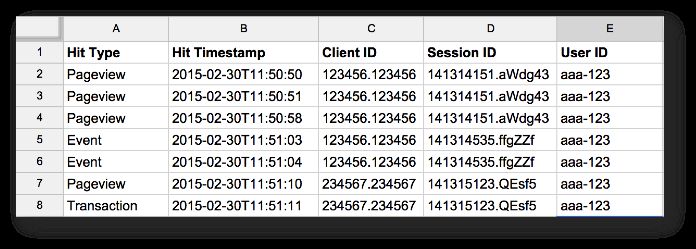
On this (fictional) knowledge export, you may see 7 distinctive hits, made by two completely different consumer IDs (e.g. completely different browsers or units), which span throughout three distinct periods, however are all made by the identical, logged-in consumer. With layered data like this, you may construct clever fashions utilizing GA knowledge alone, however the potentialities it affords for knowledge integration are outstanding as properly.
Essentially the most tough certainly one of these options to implement, by far, is Consumer ID assortment, so we’ll begin with that.
2. Consumer ID
(UPDATE 5 April 2018: I like to recommend utilizing this customTask technique as an alternative for sending the Consumer ID in a Customized Dimension. The tracker object technique outlined beneath is extra sophisticated and way more unreliable. With customTask, you may ship the Consumer ID with any tag you need, with 100% accuracy every time.)
The issue with Consumer ID is that the ga interface you employ to retrieve the Consumer ID doesn’t carry out properly in actual time, particularly for Tags firing very early within the web page load sequence (e.g. your Web page View Tag).
You might get the Consumer ID from browser cookies, but when it’s a first-time customer to your web site, chances are high that the cookie hasn’t been set by the point the Web page View Tag fires, and also you’ll miss this data. Additionally, if there are a number of trackers on the web page, how are you aware which _ga cookie to entry? You don’t.
So, I’ve opted for a unique strategy. I’m sending the Consumer ID utilizing a non-interaction Occasion Tag, which fires when the web page has loaded. This virtually definitely ensures that the ga interface is up and working, and I can use it to tug the Consumer ID for the proper tracker. The proper tracker is recognized by querying the property ID (UA-XXXXXX-X) related to the tracker object.
This explicit knowledge assortment technique would require the next components:
-
Session-scoped Customized Dimension, to gather the info in Google Analytics
-
Customized JavaScript Variable, which will get the proper Consumer ID
-
Window Loaded Set off, which fires when the window has loaded if the Customized JavaScript Variable returns a sound worth
-
Occasion Tag, which sends a non-interaction occasion to Google Analytics when the Window Loaded Set off fires
2.1. Session-scoped Customized Dimension
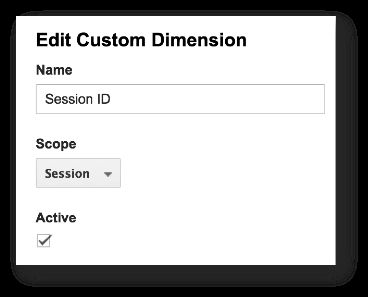
This one is straightforward. Browse to the Google Analytics Admin of the net property you wish to monitor to, choose Customized Definitions -> Customized Dimensions, and create a brand new Customized Dimension that appears just like the one beneath.

The vital factor is to decide on Session because the scope, and to make notice of the index assigned to it.
Word that if you want, you may simply as properly scope this to Person as an alternative. The Consumer ID, by definition, is similar for the consumer all through, so it’d make sense to scope it accordingly. Person-scoped dimensions are a bit questionable by way of privateness, however on this case I don’t see any problem, as you’re simply exposing a dimension that exists anyway. Because of Michael Hayes for pointing this out within the feedback!
2.2. Customized JavaScript Variable
The Customized JavaScript Variable is called {{Get Consumer ID for present Tracker}}, and it wants the next code:
operate() {
  strive {
    var trackers = ga.getAll();
    var i, len;
    for (i = 0, len = trackers.size; i < len; i += 1) {
      if (trackers[i].get('trackingId') === {{GA Monitoring Code}}) {
        return trackers[i].get('clientId');
      }
    }
  } catch(e) {}
  return 'false';
}
The operate contents are wrapped in a strive...catch block, so any errors and issues with loading the ga interface are wolfed up. If you need, you may add your individual error debugging code into the catch block. The important thing factor is to verify the Occasion Tag doesn’t hearth if there’s an issue with retrieving the Consumer ID. Because of this you would possibly miss some hits, however since we’re sending the knowledge to a session-scoped Customized Dimension, you solely want one profitable hit despatched throughout the session.
The code is designed in order that it cycles by means of all of the GA trackers on the web page. As soon as it encounters a tracker object which tracks to the property ID returned by the {{GA Monitoring Code}} variable, it returns the Consumer ID related to this object.
This implies that you will want to have a variable known as {{GA Monitoring Code}}, which returns a sound property ID (UA-XXXXXX-X). On my web site, for instance, it’s a Lookup Desk Variable, which returns my fundamental property ID for everybody else, however for me it returns a unique property ID. It’s because I take advantage of this secondary property for debugging implementations.
2.3. Window Loaded Set off
The Window Loaded Set off is fairly easy. It’s your fundamental Web page View Set off, the place you set the Set off Kind to Window Loaded. Nonetheless, you have to an extra situation in it.
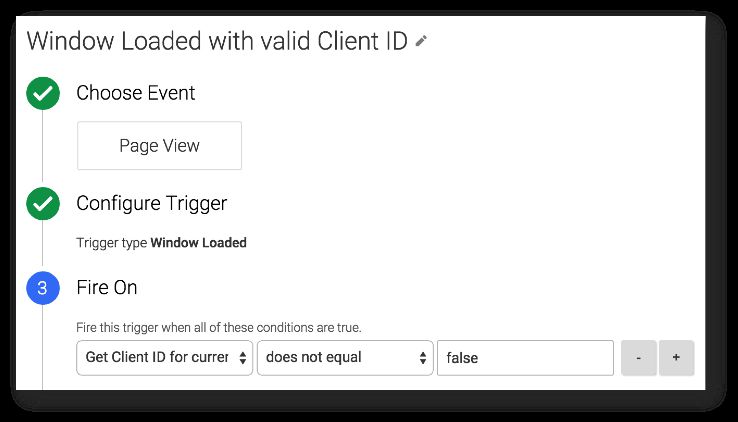
The situation Get Consumer ID for present Tracker doesn’t equal false ensures that the Set off solely fires if the Customized JavaScript Variable you simply created returns a sound worth.
2.4. Occasion Tag
The Occasion Tag could be very fundamental, besides for 2 customizations. First, you want set its Non-Interplay worth to true. This prevents the Occasion from being calculated into interplay metrics like Session Length and Bounce Fee.
Additionally, you’ll want so as to add a Customized Dimension to the Tag, through Extra Settings -> Customized Dimensions. Add the index variety of the dimension you created in step 1 to the Index area, and add the Variable reference you created in step 2 to the Worth area.

You’ll be able to see how the fields ought to look from the picture above.
2.5. Finish end result
For those who did all the things appropriately, you need to see your periods populating with a brand new Customized Dimension that you would be able to add to your stories, and pull out of GA through the API or through the reporting interface, if you want.
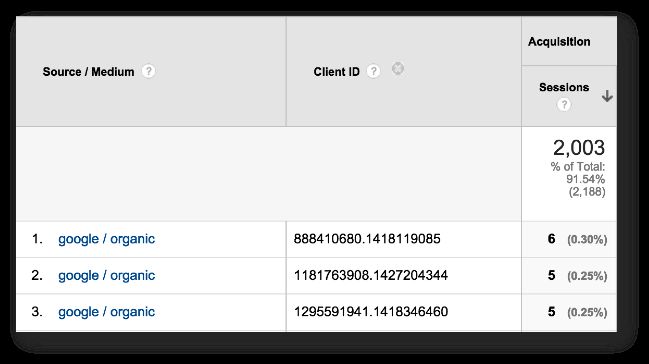
The dimension incorporates the Consumer ID of the customer. You’ll be able to then use this in your backend, for instance, whenever you wish to sew hits despatched from the identical _ga cookie collectively in significant methods.
3. Session ID
For Session ID, we’re utilizing a randomized string that’s despatched with every Pageview hit to Google Analytics. The string adjustments with every Pageview, however this doesn’t matter. Since you’re sending it to a session-scoped Customized Dimension, solely the final worth you ship shall be utilized to the hits within the session.
The required parts are:
-
Session-scoped Customized Dimension, to gather the info in Google Analytics
-
Customized JavaScript Variable, which returns a sound Session ID string
-
Small modification to your Web page View Tag, in order that the Session ID is shipped to Google Analytics
3.1. Session-scoped Customized Dimension
That is just about the identical step you went by means of within the earlier train.
Simply keep in mind to make notice of the index quantity, once more.
3.2. Customized JavaScript Variable
The Customized JavaScript Variable is aptly named {{Random Session ID}}, and it has the next code:
operate() {
    return new Date().getTime() + '.' + Math.random().toString(36).substring(5);
}
This script creates a reasonably distinctive, randomized session ID. It does it by taking the hit timestamp in Unix time, including a interval, and following with a random string of alphanumeric characters. Due to the timestamp (correct as much as milliseconds), it’s very inconceivable that two related session IDs are ever created.
An instance of a session ID could be: 1427856715104.jdubr7umobt9.
3.3. Modified Web page View Tag
In your Web page View Tag, add a brand new Customized Dimension below Extra Settings -> Customized Dimensions. Set the index quantity you bought from step 1, and set the worth to the Variable reference {{Random Session ID}} you simply created.
By utilizing solely the Web page View Tag, you’ll be sending the Session ID with every web page load. Solely the final Session ID you ship will stay, nonetheless, and all of the hits within the session will routinely be annotated with this ID, because of the session-scoped Customized Dimension. If that is complicated, keep in mind to learn up on Customized Dimensions!
3.4. Finish end result
By advantage of the Customized Dimension, you now have an identifier with which you’ll be able to sew collectively arbitrary, discrete hits in Google Analytics.
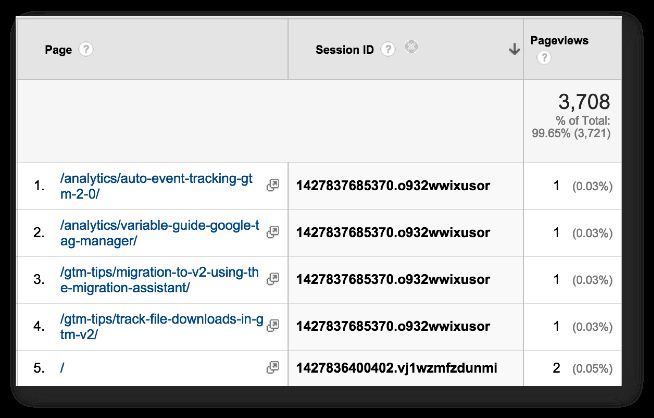
Along with the hit timestamp, you can begin constructing lifelike go to paths, if that fits your fancy.
4. Hit timestamp
Hit timestamp is one thing you need to ship with each single hit you ship to Google Analytics. Because of this you’ll want to change all of your Google Analytics Tags, which could seem to be a chore.
Accuracy is, after all, utterly as much as you, and you may choose to solely ship the timestamp with Pageviews and Transactions, as an alternative.
What you’ll want:
-
Hit-scoped Customized Dimension, to gather the timestamp in Google Analytics
-
Customized JavaScript Variable, which returns a sound timestamp string
-
Modification to all of your tags, to which you need the timestamp to be hooked up
4.1. Hit-scoped Customized Dimension
There’s nothing spectacular about this one. Create a brand new Customized Dimension in GA Admin, and set its scope to Hit.
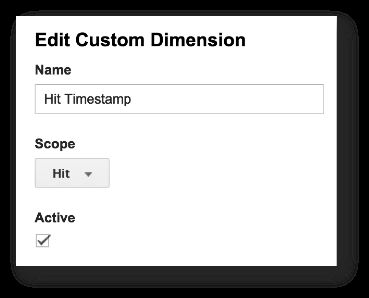
Keep in mind to make notice of the index.
4.2. Customized JavaScript Variable
The Customized JavaScript Variable must return the timestamp in String format. Now, there are lots of methods you may do that, for instance:
-
Get timestamp in Unix time (milliseconds since Jan 1, 1970), adjusted for consumer timezone
-
Get timestamp in Unix time, transformed to UTC
-
Get timestamp as an ISO string, adjusted for consumer timezone
-
Get timestamp as an ISO string, transformed to UTC
-
Get customized string, adjusted for native time or transformed to UTC
-
One thing utterly completely different
In my setup, I wished the timestamp to be custom-made for my very own tastes. That implies that I’m parsing it to resemble an ISO timestamp, however I’m utilizing consumer native time together with the timezone offset, so I can see simply which timezone the consumer is in. So, for instance, if a customer comes from Finland, which is GMT+3 (silly daylight financial savings time), the hit timestamp would possibly appear to be this:
2015-04-03T18:55:27.466+03:00
This interprets to April third, 2015, at 6:55PM Helsinki time.
Because of Tuomas Salste for recognizing a few bugs within the code!.
So, to get one thing like this, some JavaScript is required. Create a brand new Customized JavaScript Variable, and identify it {{Hit Timestamp Native Time With Offset}}. Add the next code inside:
operate() {
    // Get native time as ISO string with offset on the finish
    var now = new Date();
    var tzo = -now.getTimezoneOffset();
    var dif = tzo >= 0 ? '+' : '-';
    var pad = operate(num, ms) {
        var norm = Math.flooring(Math.abs(num));
        if (ms) return (norm < 10 ? '00' : norm < 100 ? '0' : '') + norm;
        return (norm < 10 ? '0' : '') + norm;
    };
    return now.getFullYear()
        + '-' + pad(now.getMonth()+1)
        + '-' + pad(now.getDate())
        + 'T' + pad(now.getHours())
        + ':' + pad(now.getMinutes())
        + ':' + pad(now.getSeconds())
        + '.' + pad(now.getMilliseconds(), true)
        + dif + pad(tzo / 60)
        + ':' + pad(tzo % 60);
}
This code has been gratefully copy-pasted type this StackOverflow dialogue.
This script works throughout all browsers, and returns a parsed string timestamp, with the timezone offset appended to the string.
4.3. Modified Tags
I ship this timestamp with each single Tag that’s firing on my web site, however should you really feel like that is overkill, you may select to solely ship it with business-critical hits you’ll use with different backend knowledge, for instance.
The one factor that you must do is add the Customized Dimension to any Tag you wish to ship it with. The setting seems to be like this:

Keep in mind to set the Index accordingly. Return to Google Analytics Admin, and search for the Customized Dimension you created in Step 1 to get the proper index quantity.
4.4. Finish end result
What you’ll get is one thing like this:
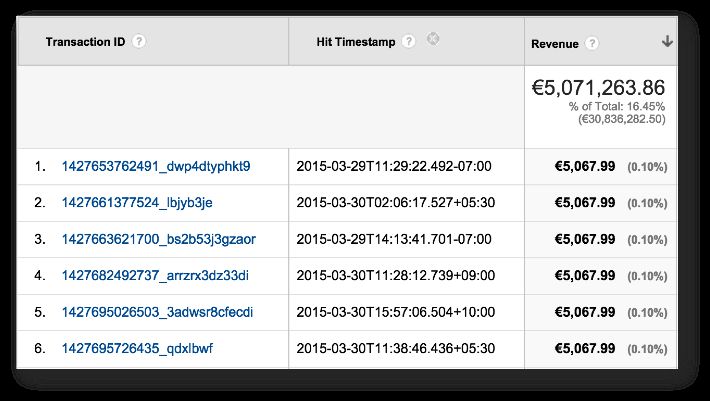
It’s all of your transactions, coupled with the correct hit timestamp in native time when the transaction was recorded. The timezone offset helps you examine knowledge along with your backend, if it makes use of server time or some fastened timezone in its personal knowledge assortment.
5. Person ID
For Person ID, you’ll must have it already carried out in a roundabout way or one other. On this instance, we’ll pull the ID from dataLayer, however you may be utilizing a 1st Celebration Cookie as an alternative, which suggests you’ll want to change the code accordingly.
Keep in mind that monitoring Customers throughout periods and units is a tough enterprise each technologically and ethically. I’ll go away issues like consent, opt-out, anonymisation, and privateness to linger within the nether areas of your thoughts, so keep in mind to make sure that what you’re doing is taken into account OK by no less than one different individual in the precise way of thinking.
We’re utilizing a hit-scoped Customized Dimension once more, however you may select what stage of accuracy and stitching to implement. I’ve reasoned for hit-level accuracy to start with of this text (wow, that was a LONG time in the past), and I believe the reasoning is well-founded. Additionally, relying on what you wish to do with the info within the backend, you would possibly select to ship the Person ID with all hits or with simply some hits.
To reveal Person ID as a Customized Dimension in your hits, you’ll want:
-
Hit-scoped Customized Dimension, to gather the Person ID in Google Analytics
-
Knowledge Layer Variable, which picks up the Person ID from
dataLayer -
Modified Tags, to which you need the Person ID to be hooked up
5.1. Hit-scoped Customized Dimension
The Customized Dimension is easy, after all. Simply go to Google Analytics Admin, browse to Customized Definitions below the net property you wish to set this up with, and create a brand new Customized Dimension of Hit scope:
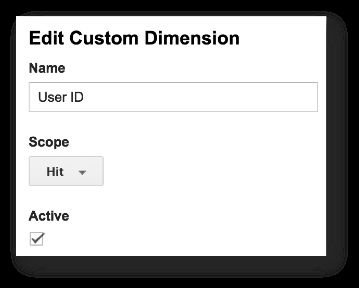
As earlier than, make notice of the Index.
5.2. Knowledge Layer Variable
The way you truly retrieve the Person ID will depend on the way you expose it in your web site. An excellent technique is to populate it in dataLayer by a server-side course of, which renders it along with the remainder of the web page. This manner the Person ID shall be cemented within the web page template, and you need to use it along with your essential tags that fireplace early on within the web page load sequence.
I take advantage of dataLayer to implement Person ID, so all I must create is a Knowledge Layer Variable that picks up the Person ID from the info mannequin, and returns the worth saved inside. On my web site, the variable is called {{DLV – userId}}, and it seems to be like this:
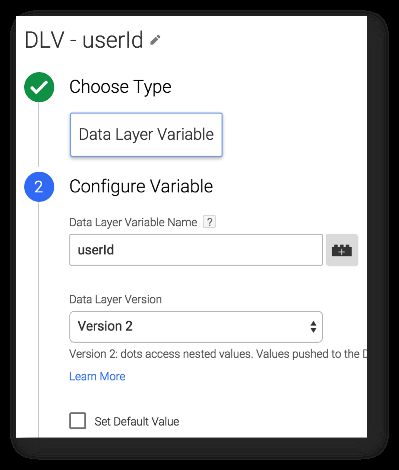
As you may see, I’m not setting a default worth within the Variable. Because of this if userId is not set in dataLayer, this Variable will resolve to undefined, and the Customized Dimension shall be dropped from any Tag that makes use of it. It is a great function of the analytics.js library, and it actually helps in preserving your Tag setup good and lean.
5.3. Modified Tags
Subsequent, add the Variable you simply created into all of the Tags you wish to affiliate with logged in customers. I ship it with each single hit, as a result of I desire a complete evaluation of what my guests do on the location.
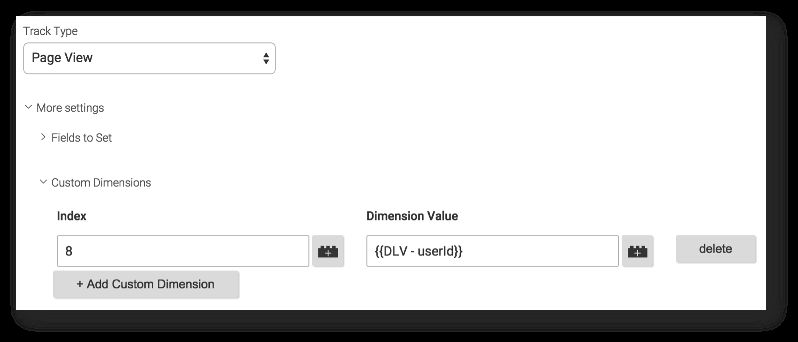
Keep in mind to set the Index appropriately in line with what you setup earlier in Google Analytics Admin.
5.4. Finish end result
What you’ll get is an additional annotation on all of your hits from logged in customers:
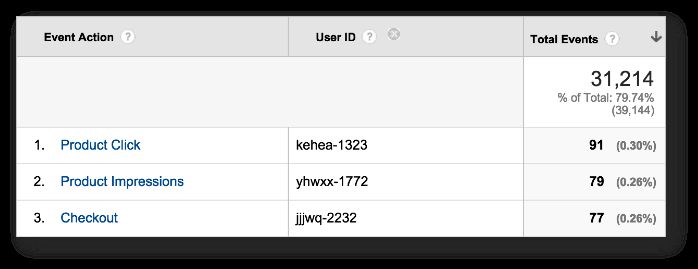
Now, let’s not child ourselves. For those who’re sending Person ID with only a handful of hits, and also you’re additionally amassing Consumer ID, you may extrapolate Person ID in your backend to all of the hits achieved by the Consumer IDs related to the Person ID dimension. Like I wrote to start with of this text, the moral, authorized, and privacy-related concerns are yours to make alone.
6. Abstract
This text explores one thing I really feel enthusiastic about: significant knowledge assortment. Google Analytics makes use of a whole lot of data that isn’t uncovered within the reporting interface or the APIs, regardless that this data is central to how the platform aggregates the hits coming in from digital properties.
Having the ability to entry this sort of granular knowledge shouldn’t be reserved for BigQuery customers alone, so the options on this publish make it easier to add an additional stage of accuracy to the stream of information flowing to the monitoring platform. You’ll be able to then pull this knowledge out, mix it with different backend knowledge, and construct highly effective fashions that may help you optimize your digital properties higher than earlier than.


/cdn.vox-cdn.com/uploads/chorus_asset/file/25588208/Megalopolis_Adam_Driver.png)


