


On this submit I wish to share a few of the key phrases that I’ve used and located affect the composition which contains of the Digicam Place (distance of digicam from topic) and the Digicam Angle (the place the digicam is place relative to the topic). Though this submit is solely specializing in Secure Diffusion XL (SDXL) the identical could be utilized to Secure Diffusion (SD), Midjourney, Adobe Firefly, or Leonardo.ai
Firstly to supply the key phrases we search the online to discover a good useful resource and the location I discovered most helpful was https://www.studiobinder.com/weblog/ultimate-guide-to-camera-shots/ and numerous others I can’t recall as I used to be amassing key phrases round framing and angle.
Key phrases – Framing and Angle
Now that we now have collected the key phrases, let’s discover the key phrases and the way they may have an effect on the composition.
Digicam Framing/Distance – right here we begin very a lot zoomed in near the topic after which slowly pull again to disclose the complete head-to-toe shot of the topic.
- excessive close-up
- close-up
- medium close-up
- medium shot
- lengthy shot
- establishing shot
- medium full shot
- full shot
- higher physique shot
- full physique shot
Digicam Angles/Place
- entrance view
- bilaterally symmetrical
- facet view
- again view
- from above
- from under
- from behind
- extensive angle view
- fisheyes view
- macro view
- overhead shot
- high down
- fowl’s eye view
- excessive angle
- barely above
- straight on
- hero view
- low view
- selfie
For the aim of the demonstration we are going to use the identical immediate and use the XYZ Plot choice in Secure Diffusion WebUI to plot each the digicam framing and angle. I batch up the immediate and go away my PC for 30-40mins whereas it churns out the photographs.
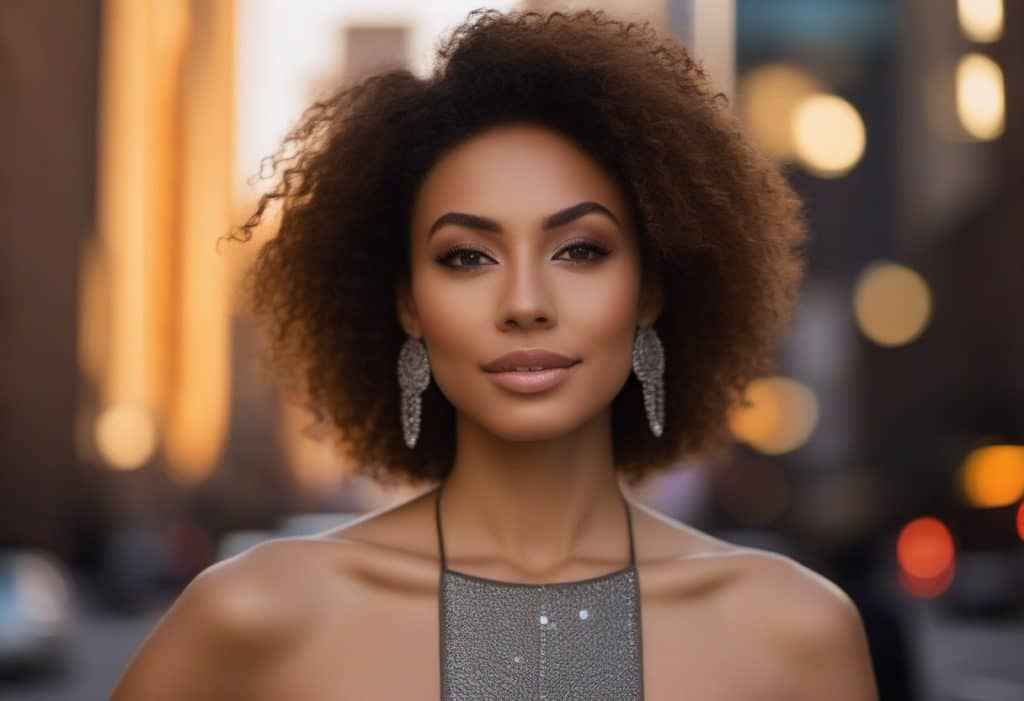
1st row immediate: <framing>, BREAK a stunning lady with brief darkish hair, big apple metropolis, <framing>, sundown
immediate: <framing>, <angle>, BREAK a stunning lady with brief darkish hair, big apple metropolis, <framing>, <angle>, sundown
On the finish of all of the processing Automatic1111 produces the required GRID for comparability and overview. I save the picture and down-scale it to a workable measurement. Subsequent step is to rigorously analyse these picture to start out making some assessments. The primary row is solely specializing in the framing or distance of the digicam from the topic.
Framing Evaluate
This row is essential and can permit us to already discard so many picture which we are able to exclude for the remainder of the batch.
- excessive close-up: it really works nicely actually zooms into the eyes of the topic. So it is a keeper.
- close-up and medium close-up: these just about produce the identical end result and you may confirm this by reviewing the remainder of the photographs in these columns. So I’ll preserve close-up because the key phrase and discard medium close-up.
- medium shot: you begin to see the digicam zoom out a bit to disclose the shoulders and you may see persistently as you go down this column. Nevertheless, as per the totally different composition guides from actual digicam its not fairly the identical.
- lengthy shot and establishing shot: each are related definitions as they each present the topic of their surroundings to set the scene of the place the topic is. As you scroll down this column there are some distinction when mixed with the digicam angle, nonetheless I really feel establishing shot could be extra distinct in a immediate and lengthy shot when mixed with digicam angle. It additionally steps again a bit extra to disclose extra of the topic.
- medium full shot and full shot: each set of key phrases are leading to the identical form of framing. Scrolling down the picture column the produce very related outcomes. They don’t seem to be aligned nicely with the digicam framing of actual phrase however nonetheless produce a wider shot. These are similar to medium shot so we are able to discard these.
- higher physique shot: this doesn’t produce any distinctive outcomes and is much like close-up key phrases.
- full physique shot: this could body the topic from head to toe and positively exhibits extra of the topic then all the opposite key phrases.
So in conclusion we are going to stick to following key phrases for our prompts: excessive close-up, close-up, medium shot, establishing shot and full physique shot.
Digicam Angle Evaluate
- entrance on and straight on: these produces just about the identical outcomes the place the topic is usually trying on the digicam. Nevertheless as we alter the framing the topic begins to look away. We will use both of the key phrases however I like straight on so I’ll use these for additional investigation.
- bilaterally symmetrical: though this isn’t a digicam angle however as I found this throughout my analysis, the topic is centered and symmetrically framed. It does change as we zoom out in our framing.
- facet view: facet profile view of the topic which is accurately represented within the outcomes.
- again view and from behind: forces the digicam behind the topic and subsequently we needs to be seeing the again of the pinnacle. Each produce very related outcomes.
- from above: It really works most often as we zoom out and transfer far again from the topic. Digicam is positioned above the attention stage of the topic.
- from under: it really works fairly nicely as we transfer throughout the totally different framing of the topic. Digicam is positioned under the attention stage of the topic.
- extensive angle view: this sort of overlaps as angle of view and framing. Clearly we are able to see that that when paired with close-up and so forth. it produces conflicting outcomes. However as we zoom out we get a wider body and angle on the topic.
- fisheye view: fisheye lens and angle can add a inventive flare to your photos and as you may see aside from the primary picture, others symbolize the fisheye impact within the outcomes.
- overhead shot: up shut framing doesn’t appear to think about this angle however as your framing strikes out the outcomes begin to be accurately represented.
- high down shot: appears to work because the digicam strikes out however not very nicely if you find yourself up shut.
- fowl’s eye view: this produces related end result to the highest down shot and there may be not a lot distinction. It doesn’t go as excessive because the fowl however I’m wondering if having extra particular phrases will obtain higher end result.
- excessive angle: this doesn’t produce the anticipated lead to any form of framing.
- slight above: solely appears to provide the anticipated lead to one picture, the remainder just about at eye stage.
- hero view: appears to provide the proper end result even when up shut vs extensive angle. It’s producing photos that locations a digicam so its trying up on the topic. Producing that hero shot!!
- low view: very a lot much like the hero view.
- selfie: it additionally produces the specified end result because the digicam goes to be shut so positions that transfer the digicam away don’t produce the coherent end result. Many of the digicam placements have little to no have an effect on eg. Full physique shot is just not potential with a selfie.
Now let’s summarise which angles seem to work finest from the collection. These are straight on, bilaterally symmetrical, facet view, again view (or from behind), from above, from under, extensive angle view, fisheye view, overhead shot, high down shot, slight above, hero view, slight above, and selfie.
Now to stress the, you may at all times improve the load of those key phrases in your immediate, this may give extra significance to your ensuing picture. eg. (hero view:1.3)
Combining the framing and angle
To create nicely composed photos it is advisable mix the body/place of the digicam with the suitable pairing by way of the digicam angle. This additionally consists of the side ratio of the picture; panorama or portrait.
All the photographs are composed utilizing SDXL 1.0 at 1216x832px measurement (panorama) and 832x1216px measurement (portrait). The CFG scale was set to eight.5 and 25 steps had been used with Random Seed.
Let’s discover a number of of those with pattern picture.

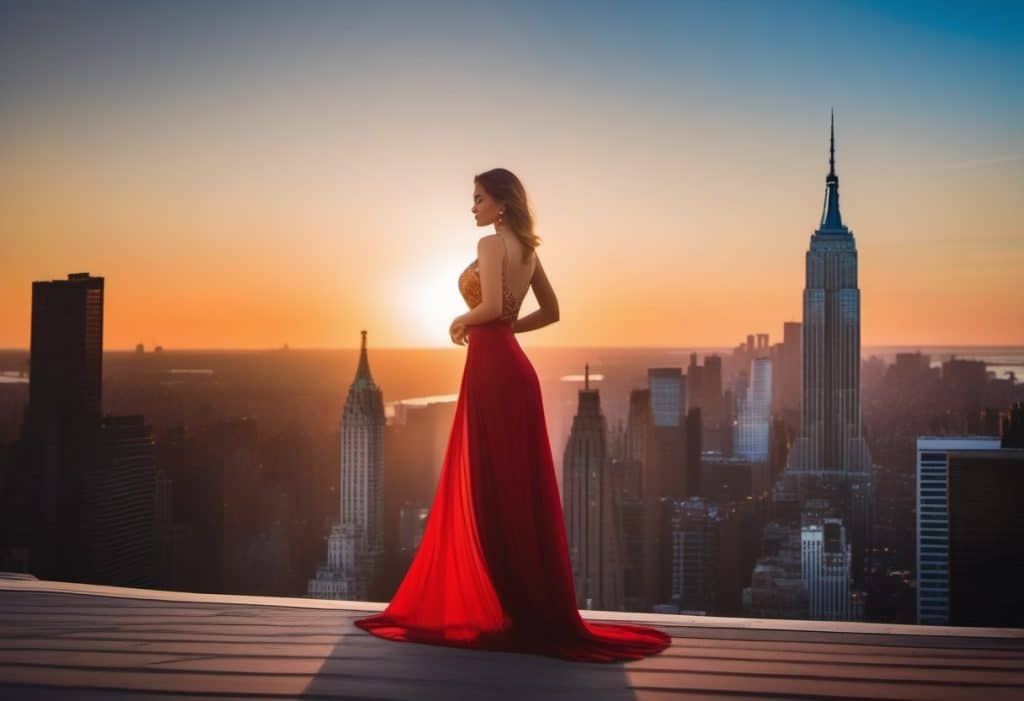


Switching up photos in portrait work nicely because it provides extra room to border the topic accurately and place the digicam on the proper angle.
What’s the conclusion of all this, nicely there isn’t one. Sure key phrases have a extra profound have an effect on on the picture and the way its framed and composed. The seed additionally has a key issue within the ensuing picture which I seen when creating batches of photos utilizing the identical immediate, there are some seeds the place it should work nicely and you’ll get the specified end result however others which is not going to adhere to the immediate so nicely. So my suggestion is to maintain making an attempt, discover the suitable seed numbers after which you may work on refining the picture and upscaling and so forth.


/cdn.vox-cdn.com/uploads/chorus_asset/file/23932925/acastro_STK108__03.jpg)

